Waffle Pod Construction in Australia
Current Melbourne waffle pod slab rates, full first-principles cost calculation, and how it compares to raft slab. Updated March 2026 by a Certified Quantity Surveyor.
Waffle Pod Construction in Australia
By Coba Pekaj, MAIQS CQS - Director, Pekaj Group
Updated March 2026. Waffle pod slab costs in Melbourne currently range from $95 to $160 per m2 for supply and install depending on slab size, soil class and reinforcement requirements. Raft slabs typically run 15 to 25% more than equivalent waffle pod slabs due to the additional excavation and concrete volume involved.
This guide walks through the full calculation process from first principles, covering material quantities, labour productivity and current Melbourne rates.
In the ever-evolving field of construction, engineers and builders are constantly seeking innovative methods to enhance efficiency, reduce costs, and improve environmental sustainability. One such method which has been gaining popularity in Australia for the past 20 years is the use of waffle pod slabs, a modern foundation system that combines strength and versatility. In this blog post, we will delve into the intricacies of waffle pod slabs and walk through the calculations involved in their construction.
Understanding Waffle Pod Slabs
Waffle pod slabs consist of a grid of voids (pods) separated by reinforced concrete beams. These pods serve multiple purposes, including reducing the overall concrete volume, providing insulation, and facilitating better control of ground movement. The use of waffle pods is particularly beneficial in areas with challenging soil conditions.
The waffle pod represents an advanced approach to concrete slab construction, involving on-ground construction rather than in-ground. This eliminates the necessity for trenching leading to cost savings and enhancing construction durability and strength. Waffle pods, despite their lightweight nature, are robust enough to support the weight of numerous construction workers and wet concrete during site preparation and pouring. Installation takes place on cleared, level surfaces, ensuring that inclement weather is not a hindrance. Additionally, each waffle pod slab provides exceptional strength and durability while simultaneously reducing construction costs.
Waffle Pod Slab vs Raft Slab?
Both systems have their place. The choice depends on soil class, site conditions, and budget. The table below summarises how they differ.
Soil classification and suitability of waffle slab?
The table presented below offers a concise summary of the appropriateness of the waffle slab system in different soil conditions
Calculating Materials for Waffle Pod Slab Systems:
Estimators and quantity surveyors must carefully calculate the materials needed for a waffle pod slab system. In this blog post, we will perform a thorough calculation of all elements from first principles, offering a comprehensive guide on the materials, labour, and costs involved.
Bluebeam Revu is the chosen software for performing the planned measure. Renowned for its speed and efficiency in measuring take-offs, this software is extensively utilised by residential and commercial builders. It stands out as one of the key tools employed by Pekaj Group Pty Ltd for estimating purposes.
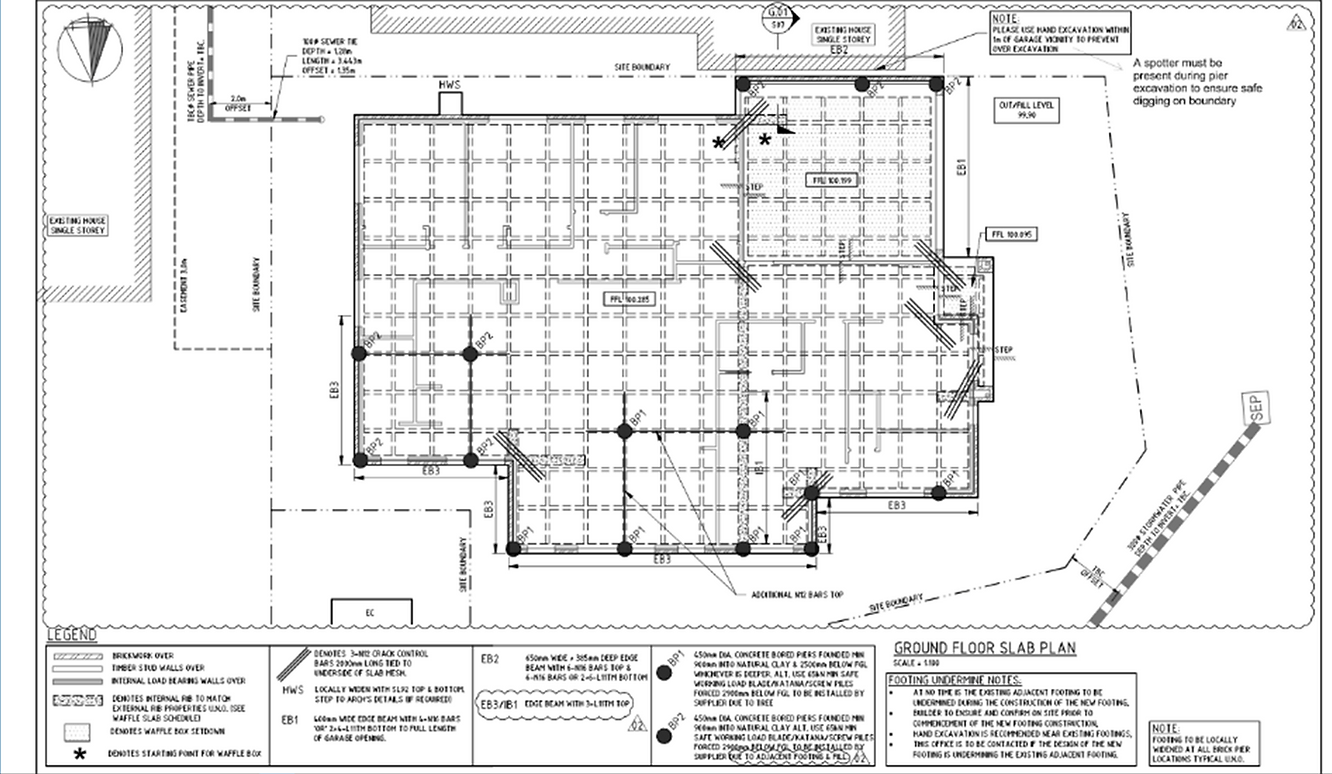
Based on the attached engineered ground floor slab plan the following elements will need to be determined which will be used for a variety of calculations.
- Edge Beam (External Rib)
- Internal Beam (Internal Rib)
- Slab Area
- Bored Piers
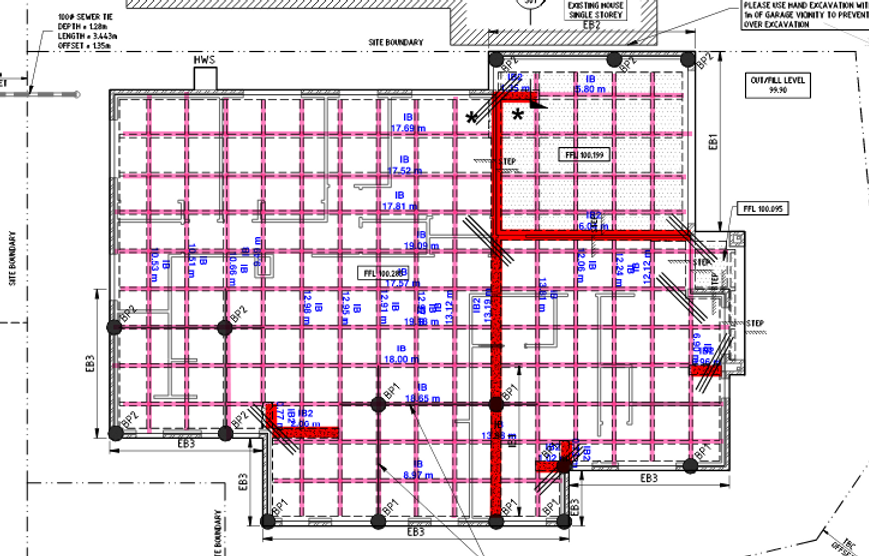
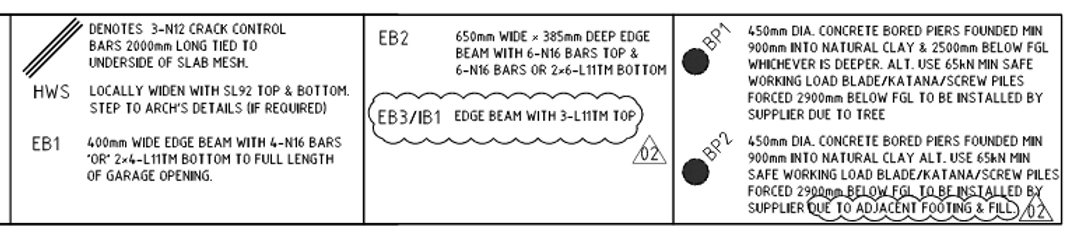
Edge beam is determined by measuring the external perimeter wall. In this example we have 3 different sizes for the edge beam.
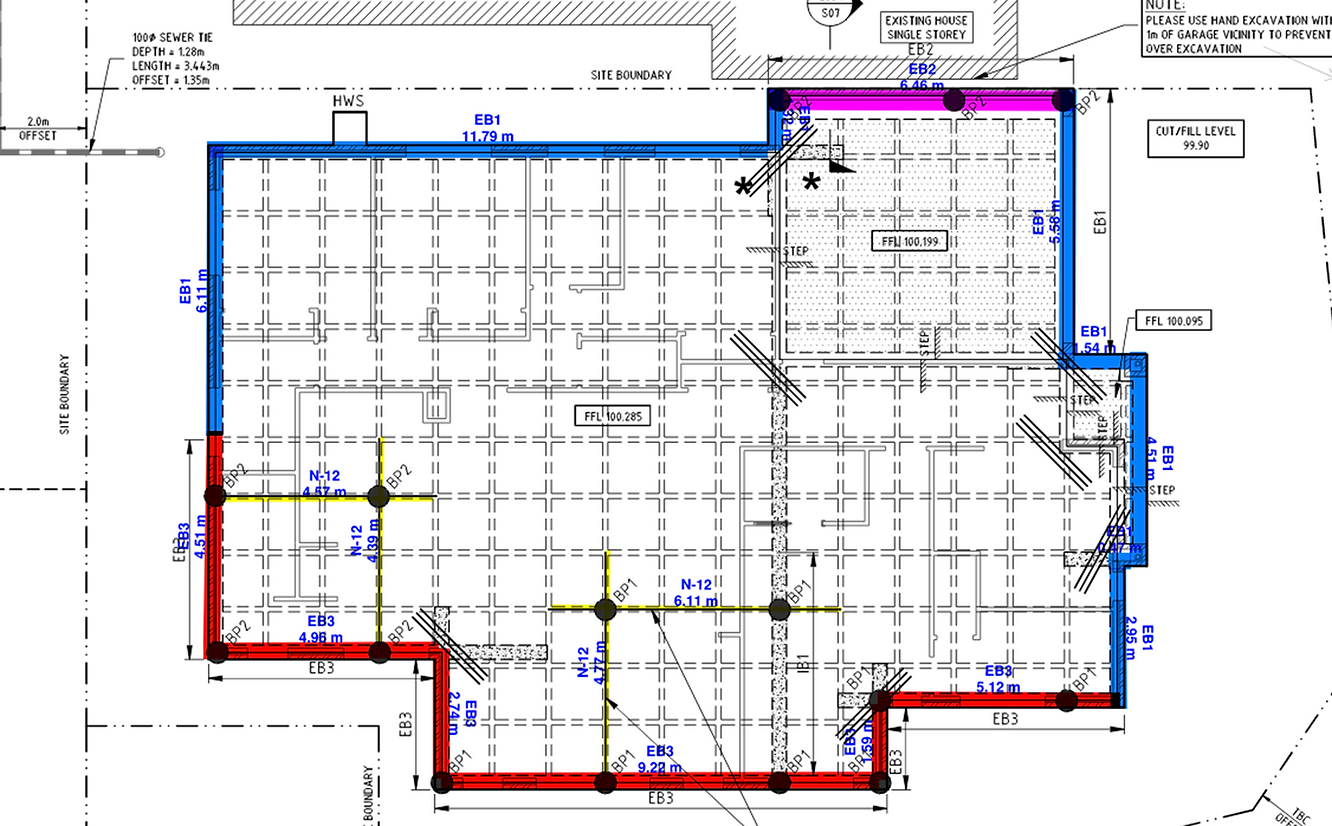
The different sizes represent different width and depth requirements hence needing to be measured individually.
- EB1 - 34.26m (Blue)
- EB2 - 6.46m (Pink)
- EB3 - 28.14m (Red)
The same principle is used to determine the internal beams. In this example we have two elements to measure.
- IB1 - 337.49m (Pink)
- IB2 - 26.13m (Red)
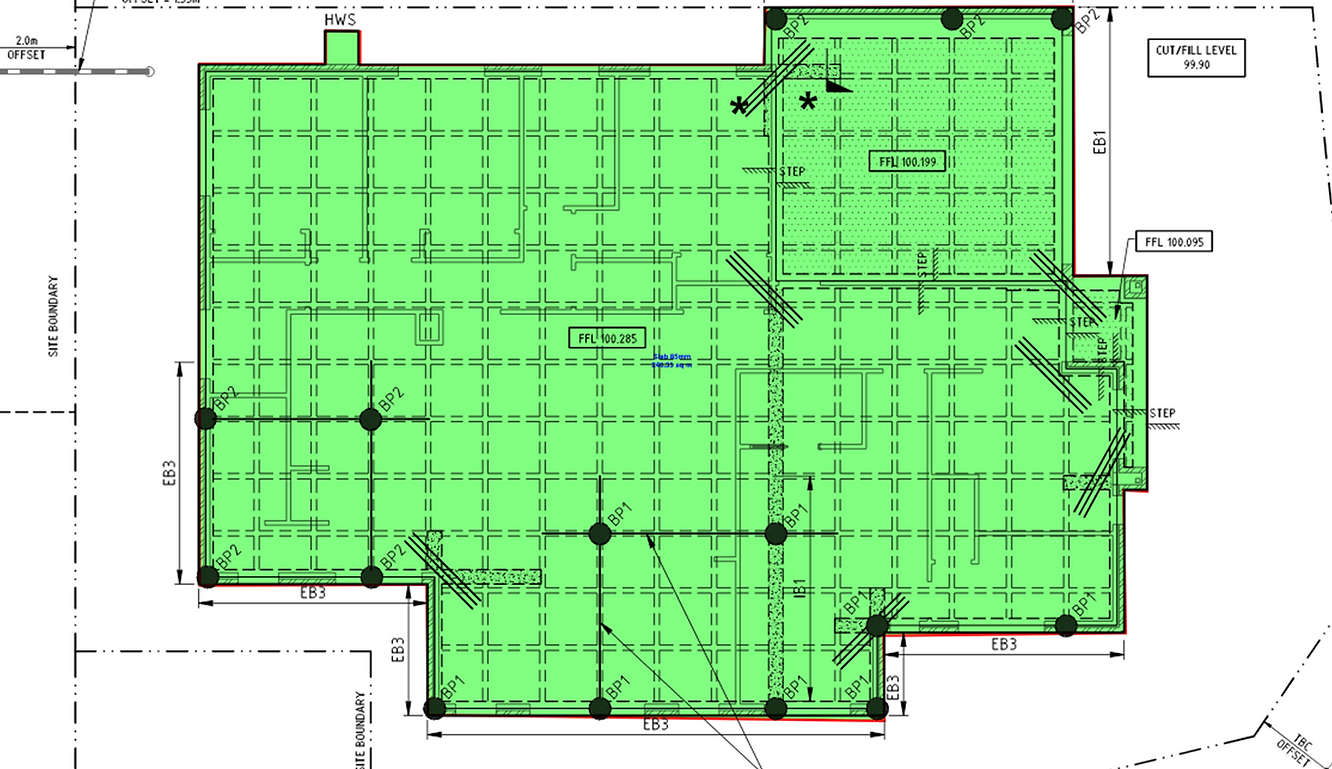
The next element to measure will be the actual slab area. Highlighted in green the total area equates to 246.35m2.
The last element to measure is the bored piers. There are two types consider for this project.
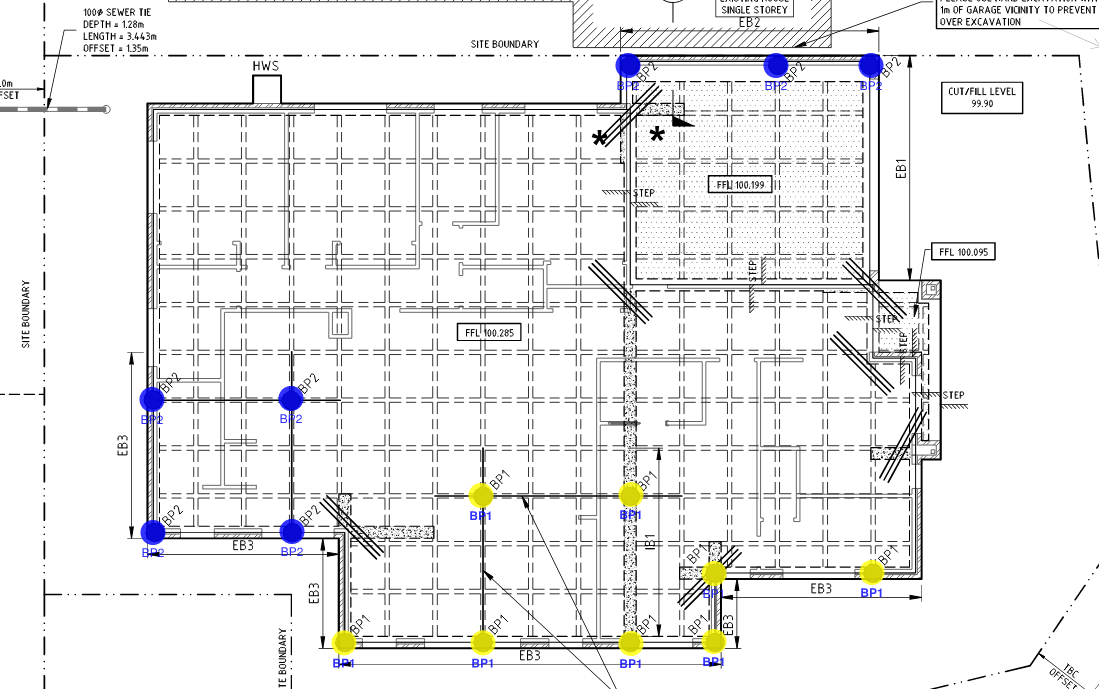
- BP1 - 8 No. (Yellow)
- BP2 - 7 No. (Blue)
Now that the initial measure has been completed, we can finally workout the associated elements to determine the total volume of concrete, reinforcement, waffle pod accessories and labour for the project.
Concrete
In order to determine the total volume of concrete for the project the following calculations need to be determined. But before that you will need to review the engineering drawings to make sure you have identified all the elements to use in your calculation from the waffle slab schedule.
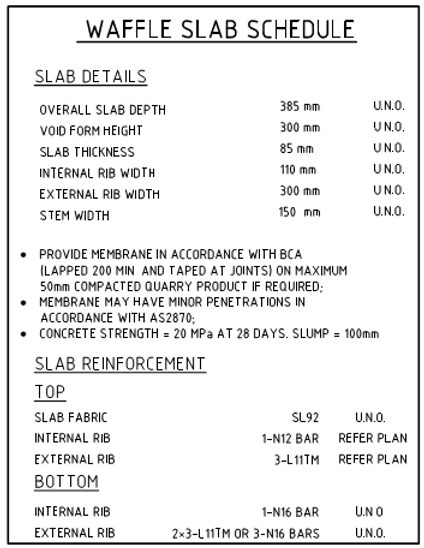
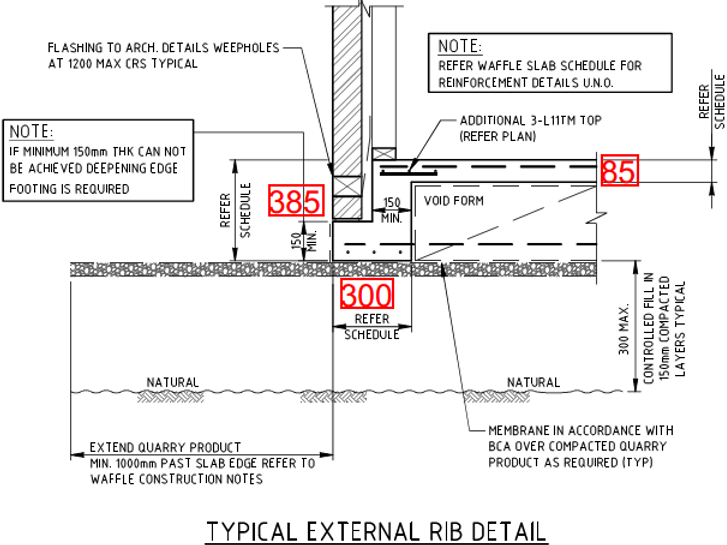
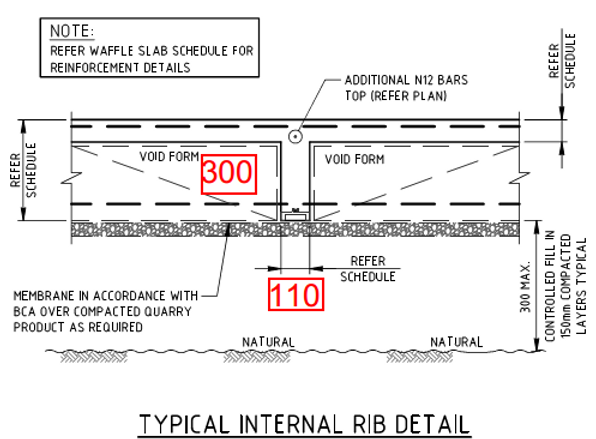
Now that the individual elements have been identified the below table will assist with the formula and calculation for this section.
In this example, the overall concrete volume is 54.00m3. Theoretically, we have accounted for concrete across all designated areas. However, in practice, there's a possibility of falling short, despite our thorough preparation.
Several factors can contribute to a shortfall in concrete:
- Inaccurate cutting of pods to fit in the designated space.
- The concreter opting for a 100mm slab thickness instead of the specified 85mm.
- Wastage and spillage during the concrete application.
- Deviation from the intended concrete mix.
- Bored piers cut wider and deeper than originally anticipated due rock floaters.
This method from first principle of calculating is hardly used, and most companies now use industry-based averages for waffle pod systems. The following averages are considered reasonable and have stood the test of time.
The amount of concrete required for this project using industry-based factors would be as follows:
Based on industry-related considerations, there is a 4.00m3 disparity in the overall concrete volume. Both methods of calculating the concrete volume are accurate. Now, the decision of which answer to adopt becomes a bit more intricate. One viable approach involves generating two purchase orders for the project. Purchase order 1 would cover 54.00m3, while purchase order 2 (4.00m3) would serve as a contingency, only to be utilised if the on-site concrete quantity exceeds the initial estimate.
Reinforcement
Reinforcement is required in waffle pod construction to enhance the structural integrity and load-bearing capacity of the concrete slab. While waffle pod slabs utilise void-forming pods to reduce the overall weight of the concrete and minimise resource usage, the reinforcement serves to address specific engineering requirements.
Key reasons for reinforcement in waffle pod construction include:
Taking into account the above noted we will now review the engineering plans to identify the various types of reinforcement required for this project.
Waffle Pod Accessories
The table below provides a quick overview of the main accessories to consider when ordering. You will need to find out from various suppliers if there are pack sizes so you can round up your quantities accordingly. You will also need to consider deliveries if you are purchasing from several suppliers in your costings.
Labour
Determining this component is challenging due to the numerous unknown factors involved. Initially, it involves a trial-and-error approach, as different contractors have unique methods and pricing strategies for projects.
For this project, we have compiled a list of tasks to take into account when determining the pricing for this specific portion of works.
Taking into consideration the above noted we will determine the number of days to complete task and size of team (gang) required.
Having determined the duration for task completion, it's crucial to factor in the labour component. Using the industry average rate for concrete labouring in Melbourne at $50.00 per hour and considering a gang size of 4, the daily labour cost is estimated at $2,000. For a 4-day duration, the labor costs should amount to approximately $8,000. It's worth noting that gang sizes for concreting typically range between 3 and 5 for residential construction projects.
Summary of Costs
The table below offers a summary of the cost considerations for this project. The price ranges presented are averages specific to the Melbourne region. It is important to note that these figures serve as general estimates, and for a more precise cost assessment, it is recommended to obtain pricing information from your local supplier.
For this specific project, the comprehensive cost for concrete (including supply and installation) is approximately $43,319 plus GST.
Breaking this down per square meter, it equates to around $176.00/m2 or $1,633 per square.
As quantity surveyor or estimator, the calculated cost serves as the initial budget for the project. Upon obtaining quotes from your sub-contractors, you can assess whether this budgetary allowance is adequate. This evaluation helps determine if any adjustments are necessary for the current project or if modifications are needed for future projects.
Current Melbourne Waffle Pod Slab Costs (2026)
As a guide for 2026, expect the following ranges for waffle pod slabs in Melbourne:
These rates include pods, reinforcement, concrete, labour and pump hire. They exclude site preparation, earthworks and any piling or ground improvement that may be required based on soil conditions.
Actual costs depend on your engineer's design, soil classification and site access.
Conclusion
The waffle pod slab is one of the most common foundation systems used in Australian residential construction and one of the easiest to misprice. The two biggest sources of error are wastage assumptions and labour productivity. A 5% wastage allowance is realistic for tightly-managed sites. Anything less and you'll be back at the supplier for a second purchase order. A four-day, four-person gang at $50/hour is appropriate for a 246m² slab. Smaller slabs scale down on time, not gang size. Price both, then choose based on site access and concrete delivery windows.

About the author
Coba Pekaj, MAIQS CQS
Director, Pekaj Group · AIQS Member #19060
23 years of Melbourne residential and commercial construction experience as a Certified Quantity Surveyor. Founded Pekaj Group in 2011 to provide independent quantity surveying, cost estimating, and feasibility services to builders, developers, and architects across Victoria.
Credential
MAIQS, CQS
Membership
AIQS Member
Experience
20+ years
Google rating
★★★★★
Other insights

Melbourne Construction Costs 2026: The Complete Guide for Builders & Developers
Melbourne construction costs 2026 - complete guide for builders and developers by Pekaj Group MAIQS CQS

Which QS Report Does Your Bank Actually Need
Four types of QS reports explained in plain English for builders, developers, and mortgage brokers. Know which one your bank actually needs before you engage.
Your Next Project?
Whether you're tendering, testing feasibility or checking a builder's price, it starts with a conversation. Call 1300 420 227 or send us your drawings.